
One-size-fits-all pricing does not work in B2B. Your loyal customer who orders 10,000 units quarterly deserves better rates than a first-time buyer ordering 50 units. But managing custom pricing manually — different prices for different customers, volume discount tiers, promotional rates, contract pricing — quickly becomes impossible to track in spreadsheets.
There are two paths to customer-specific pricing on Shopify. If you are on Shopify Plus, you can use native price lists to assign fixed pricing to customer segments. If you are on any other plan — Basic, Standard, or Advanced — you can use a quote-based workflow where buyers request a quote and your team responds with personalized pricing. See our Shopify B2B vs Shopify Plus comparison for a full breakdown of what each option includes.
This guide covers both approaches so you can choose the right one for your business.
Why Customer-Specific Pricing Matters
B2B buyers have changed. The majority of procurement professionals are now Millennials and Gen Z who expect seamless, self-service experiences — not phone calls and email chains.
Your buyers want to:
- Log into their account and see their negotiated prices
- Understand exactly what they will pay at different quantities
- Place reorders without calling for pricing
- Compare options and make decisions independently
- Receive professional proposals they can share with their purchasing team
When you offer customer-specific pricing, you reduce friction in the buying process, increase order values through volume incentives, and build long-term relationships based on transparency. Companies that personalize B2B pricing see higher conversion rates and stronger customer retention than those using flat retail pricing for all buyers.
Types of B2B Pricing Structures
1. Volume-Based Pricing (Quantity Breaks)
Price decreases as order quantity increases:
- 1-99 units: $50 each
- 100-499 units: $45 each
- 500+ units: $40 each
Best for: Commodity products, bulk purchases
2. Customer Tier Pricing
Different customer segments get different base prices:
- Tier 1 (VIP): 30% off retail
- Tier 2 (Standard): 20% off retail
- Tier 3 (New): 10% off retail
Best for: Loyalty programs, distributor networks
3. Contract Pricing
Negotiated rates locked in for a specific timeframe:
- Customer XYZ pays $42.50 per unit (valid through Dec 2026)
- All other pricing rules ignored for this customer
Best for: Enterprise accounts, long-term partnerships
4. Quote-Based Pricing
Buyers submit a request for quote (RFQ) and your team responds with a custom price based on the specific order, customer relationship, and volume. No automated price lists needed — your team has full control over every quote.
Best for: High-value orders, custom products, new customer negotiations, and merchants on any Shopify plan who need pricing flexibility without Shopify Plus.
Setting Up Customer-Specific Pricing on Shopify Plus
If you are on Shopify Plus, you can use native B2B features to create automated price lists. This section covers the built-in approach. For details on all native B2B features, see the Shopify B2B documentation.
Step 1: Enable Shopify B2B Features
Requirements:
- Shopify Plus plan (required for native B2B)
- B2B features enabled in admin
Note: If you are not on Shopify Plus, skip to the next section for the quote-based alternative that works on any plan.
Step 2: Create Customer Companies
Shopify B2B organizes customers into "companies":
- Navigate to Customers → Companies
- Click "Add Company"
- Enter company details: name, contact, addresses, payment terms, tax exemption status
Step 3: Create Price Lists
Price lists let you offer different pricing to different customer segments:
- Go to Products → Price Lists
- Click "Create Price List"
- Choose pricing method: Fixed prices, Percentage off, or Relative adjustment
- Apply to all products or select specific collections
Step 4: Assign Price Lists to Companies
- Go to Customers → Companies
- Select a company
- Scroll to "Price Lists" and assign
When users from that company log in, they automatically see their custom pricing at checkout.
Quote-Based Pricing: The Alternative for Any Shopify Plan
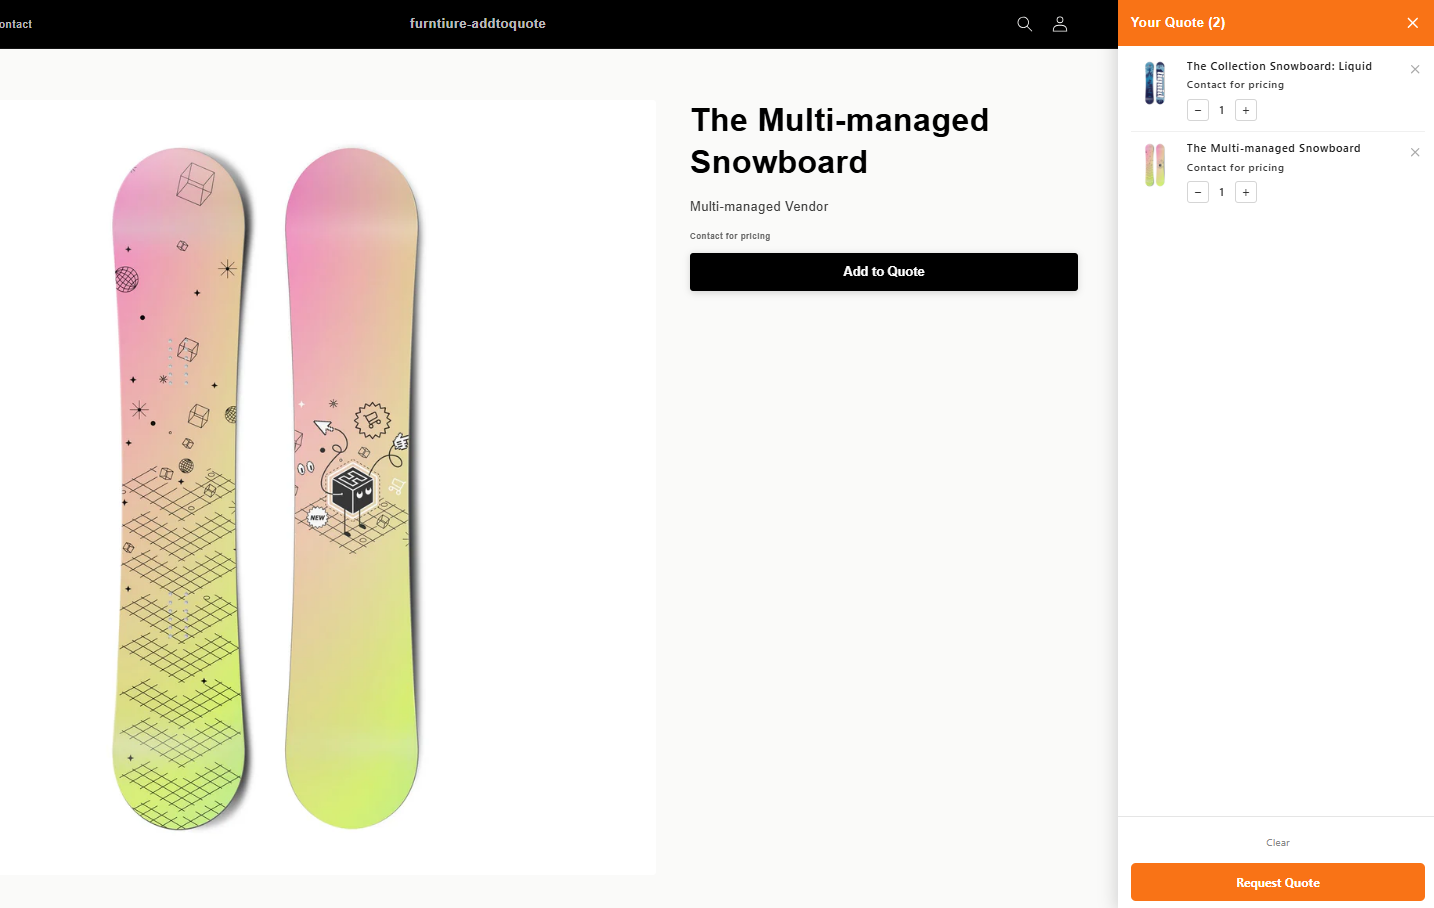
Not on Shopify Plus? You can still offer customer-specific pricing using a quote-based workflow. AddToQuote replaces the Add to Cart button with a Request a Quote button on all product pages, lets buyers submit quote requests, and gives your team a full CRM to manage pricing, generate branded PDF proposals, and convert approved quotes into Shopify draft orders — all on any Shopify plan.
Step 1: Install AddToQuote
Install AddToQuote from the Shopify App Store and complete the setup wizard. The app automatically adds a Request a Quote button to all product pages on your store. No code changes or theme editing required. For a complete walkthrough of the quote management workflow, see our B2B quote management guide.
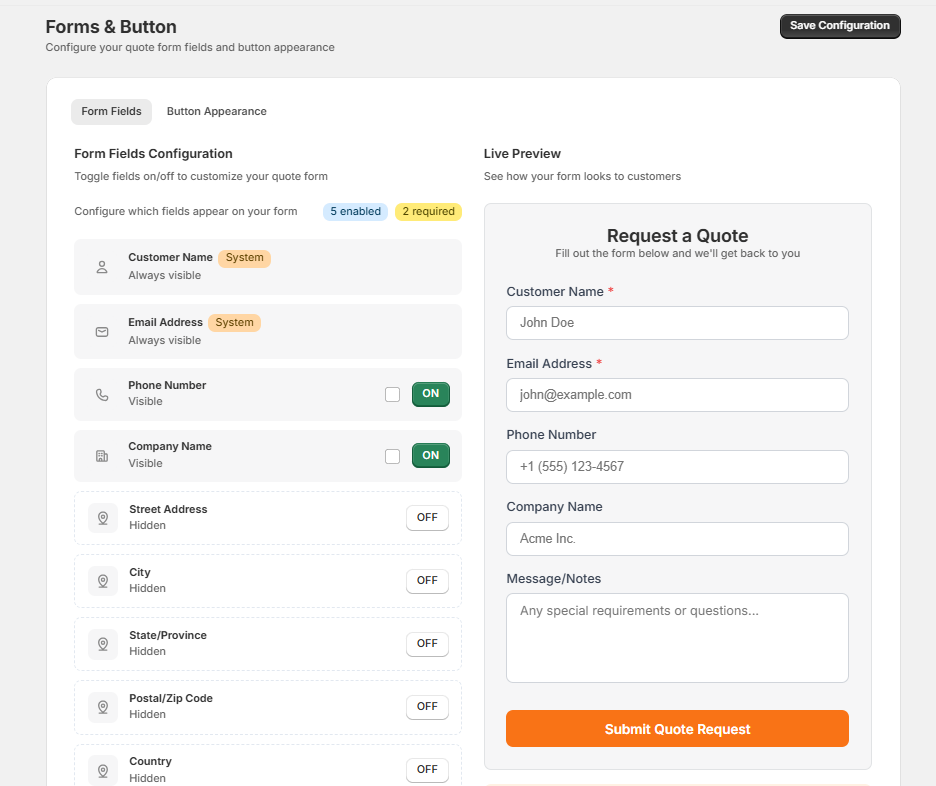
Step 2: Configure Your Quote Request Form
Use the built-in form builder to customize what information buyers provide when requesting a quote. Add fields for company name, order volume, delivery timeline, and any other details your team needs to prepare accurate pricing.
Step 3: Hide Prices to Drive Quote Requests (Optional)
For a true RFQ experience, you can hide prices on your Shopify store and replace them with a "Request a Quote" prompt. AddToQuote hides prices at the product section level through the theme editor — no code changes needed. This works on any Shopify 2.0 theme and any Shopify plan.
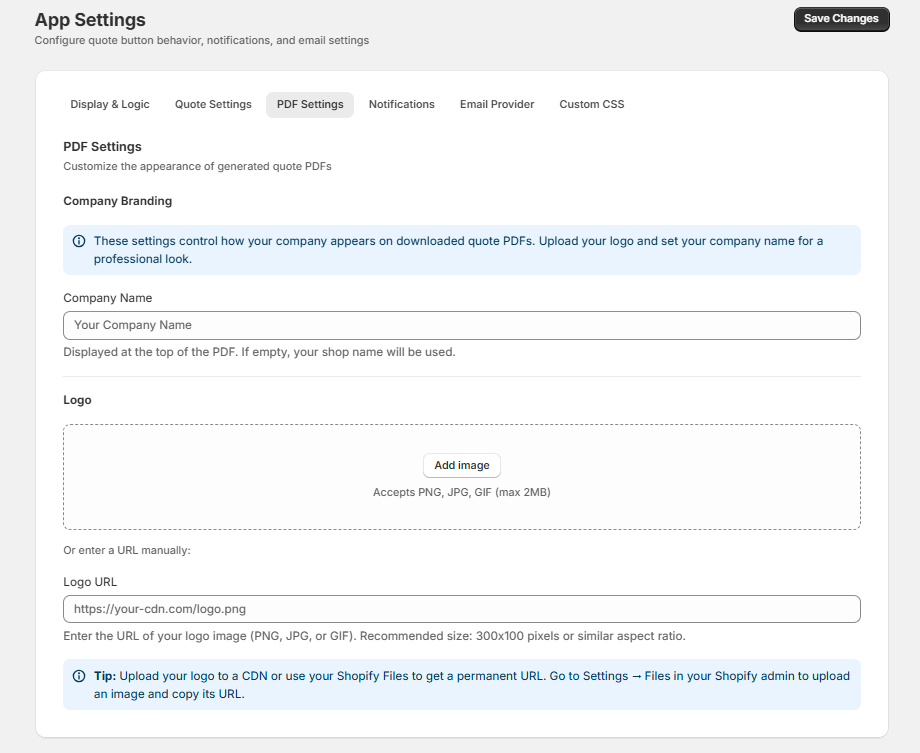
Step 4: Generate Custom-Priced PDF Proposals
When a quote request comes in, review the products, adjust pricing for that specific customer, and generate a branded PDF proposal. The PDF includes line items with custom prices, totals, payment terms, and your company branding. Send it directly to the buyer via email from within the app.
Step 5: Convert Approved Quotes to Draft Orders
Once the buyer approves the quote, click "Create Invoice" to convert quotes to Shopify draft orders with one click. The draft order preserves your custom pricing, and you can send the invoice to the buyer for payment through Shopify's standard checkout. Learn more about Shopify draft orders in the official documentation.
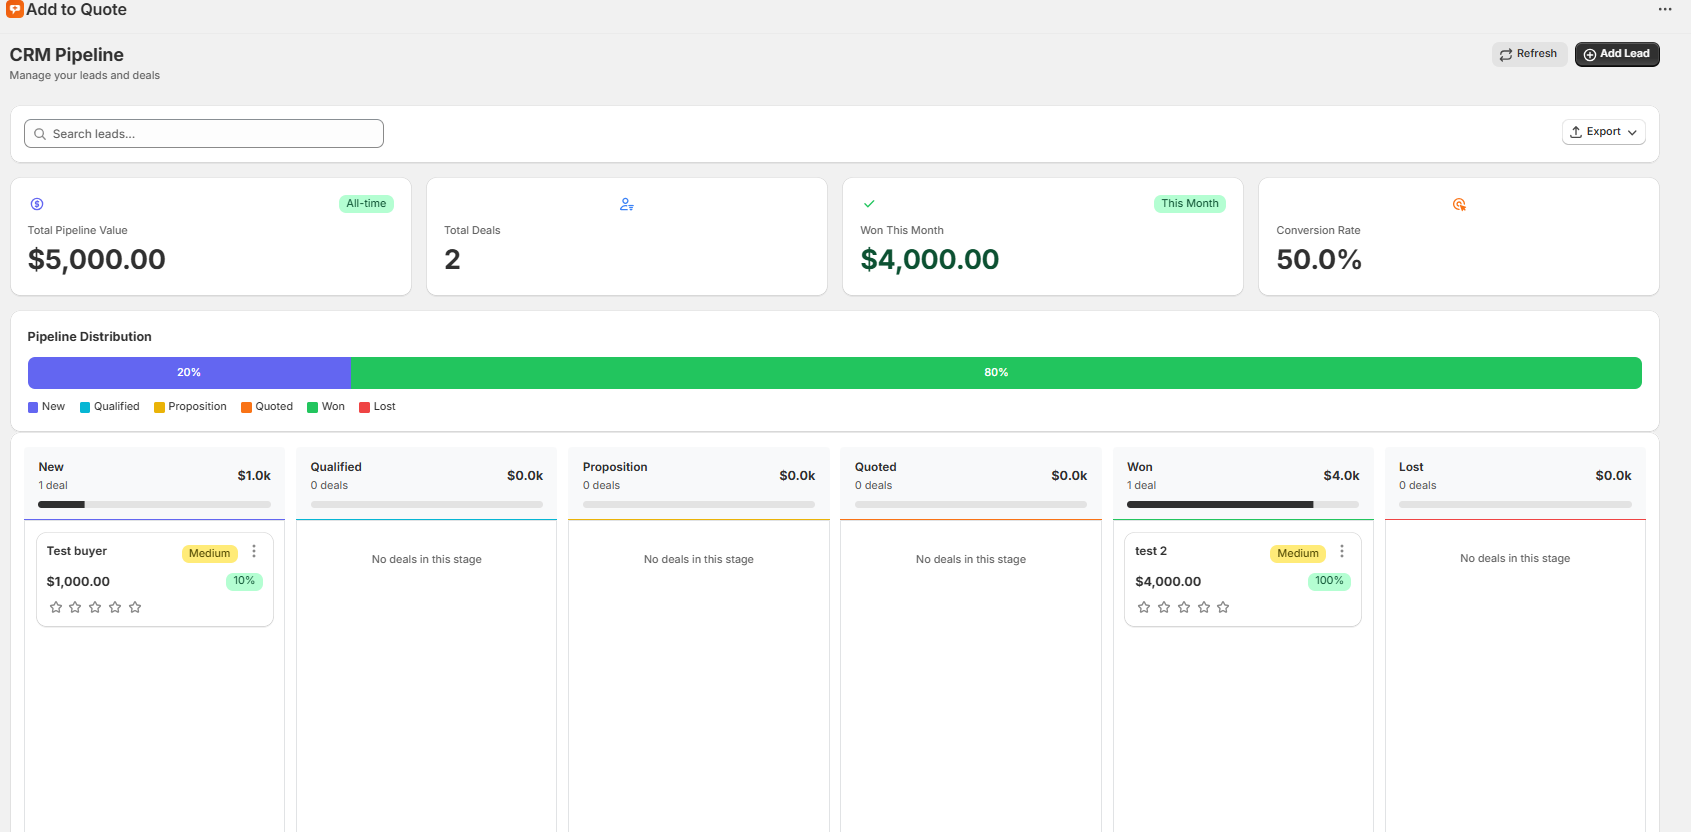
Your team can track every quote through the CRM pipeline — from New to Qualified, Proposition, Quoted, Won, or Lost — with email notifications via your connected provider at every stage.
Best Practices for Managing Custom Pricing
1. Create Clear Pricing Tiers
Do not create 20 different price points. Stick to 3-5 tiers:
- Tier 1: New customers (10% off)
- Tier 2: Regular customers (20% off)
- Tier 3: High-volume customers (30% off)
- Tier 4: Enterprise/contract (custom)
2. Document Your Pricing Logic
Create an internal reference showing customer types, discounts, minimum orders, and payment terms. This keeps your team aligned and ensures consistent pricing across all sales reps.
3. Automate Price Updates
Use Shopify's bulk editor or CSV imports to update pricing globally. For quote-based pricing, maintain templates for common scenarios so your team can respond faster.
4. Set Minimum Order Values
Prevent small, unprofitable orders by setting minimums per tier.
5. Communicate Pricing Changes
When updating prices, email affected customers 30 days in advance and explain the reason.
6. Use Negotiation Strategically
Not every quote needs to match your lowest price. Use volume commitments, payment terms, and multi-year agreements as levers instead of defaulting to the deepest discount. For proven tactics, see our guide on wholesale price negotiation strategies.
How to Get Started
You do not need Shopify Plus to offer customer-specific pricing. Here is how to start with a quote-based workflow today:
- Install AddToQuote from the AddToQuote on the Shopify App Store — works on any Shopify plan with a 14-day free trial, starting at $25 per month, no credit card required.
- Configure your quote form with the fields your team needs to price accurately.
- Enable price hiding (optional) to create a full RFQ experience.
- Respond to your first quote request with a branded PDF proposal and convert it to a draft order.
Not sure if a quote workflow is right for your store? Read 5 signs your store needs a quote app to find out.
Frequently Asked Questions
Do I need Shopify Plus for customer-specific pricing?
No. Shopify Plus offers native price lists, but you can achieve customer-specific pricing on any Shopify plan using a quote-based workflow. AddToQuote lets buyers request quotes, and your team responds with personalized pricing, branded PDF proposals, and one-click draft order creation — all without Plus.
What is the difference between price lists and quote-based pricing?
Price lists assign fixed prices to customer segments automatically at checkout. Quote-based pricing lets buyers request a quote, and your team sets a custom price per order based on volume, relationship, or negotiation. Price lists require Shopify Plus. Quote-based pricing works on any Shopify plan with an app like AddToQuote.
How do I set up volume-based pricing on Shopify?
On Shopify Plus, use native price lists with quantity breaks. On any other plan, use AddToQuote to receive quote requests and manually apply volume discounts when generating proposals. The buyer sees their custom pricing in a branded PDF quote, and you convert it to a draft order with one click.
Can I hide prices and show a Request a Quote button instead?
Yes. AddToQuote hides prices at the product section level and replaces Add to Cart with a Request a Quote button on any Shopify 2.0 theme. This works on any Shopify plan without code changes.
How do I send a customer-specific quote on Shopify?
Install AddToQuote on any Shopify plan. When a buyer submits a quote request, review the products, adjust pricing for that specific customer, and generate a branded PDF proposal with line items, totals, and payment terms. Send the PDF via email directly from the app.
What does customer-specific pricing cost on Shopify?
Shopify Plus with native price lists starts at $2,300 per month. AddToQuote provides quote-based customer-specific pricing on any Shopify plan starting at $25 per month with a 14-day free trial and no credit card required.
The Bottom Line
Customer-specific pricing is essential for competitive B2B commerce. You have two paths: native price lists on Shopify Plus starting at $2,300 per month, or a quote-based workflow with AddToQuote on any Shopify plan starting at $25 per month.
Both approaches let you offer personalized pricing to your buyers. The right choice depends on your plan, your team's workflow, and whether you need automated checkout pricing or prefer the flexibility of custom quotes with branded proposals.
Book a free demo and we will walk you through the full customer-specific pricing workflow for your store.
Mohammad Mahdawi
Founder, AddToQuote
Founder of AddToQuote. 15+ years in B2B and B2C e-commerce, building tools that help merchants quote and close more deals.


